…”Visit Korg Forums Today. The source for Everything Korg!”…
Phantom triggering a Drum Machine ARP pattern
Thanks to Dan Stesco http://www.danstesco.ro for providing this trick.
Continuing with my Fading Lights example, I managed to create an ARP pattern using the House Kit drum patch, and highly detuning it to its max, since it matches more closely the original sound. Still is not perfect, but is good enough for my needs.
Once the ARP pattern was ready, I simply created the combi, assigning the strings to Timbre 1, the lead to Timbre 2, and the drum sounds to Timbres 5 and 6, to be able to use the fake delay trick explained earlier.
But I found a problem: If ARP is on, and I trigger the pattern, everything works as expected, I play the strings, and the drum machine follows in the background. But, when I have to stop the ARP to play the lead, and I touch the keys, the drum samples play as well. Sounds really weird.
Why is that happening? Well, because Timbres 5 and 6 are assigned to the global MIDI channel, so they will play with the keyboard. How can we make the drum machine play, but avoid triggering the samples with the keyboard? We will call this: Phantom triggering the ARP with a hidden timbre.
Lets get down to it:
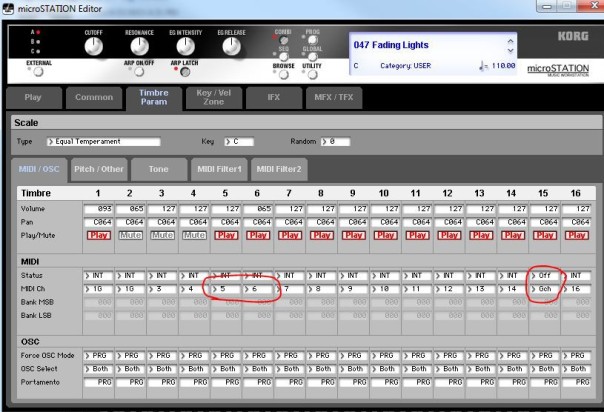
As you can see in this image, I selected the Timbres where the drum machine will play from (5 and 6) and assigned MIDI channels 5 and 6. In fact, any MIDI channel other than the one you are actually playing works. You can assign both to MIDI channel 10 if you like. If you have multiple surfaces, like myself, assign it to a MIDI channel you don’t use. I’m using channels 1, 2 and 3, so anything including and above 4, will work.
Now, lets use Timbre #15 as our Phantom Timbre. We want to turn that timbre Off, so it doesn’t matter which program you select there, you can leave it with the default piano, but assign it to the global MIDI channel, so we want to be able to trigger it with the keyboard, but still it will not play, since is Off.
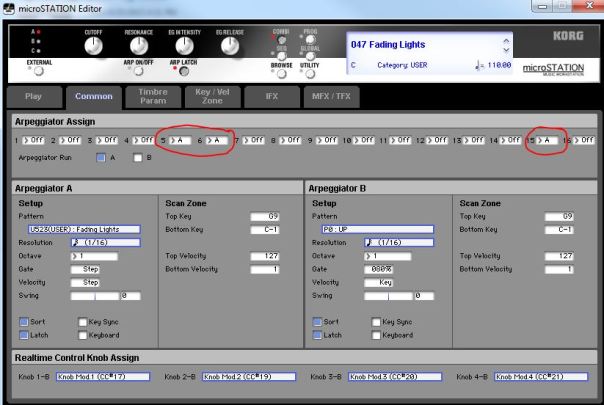
The next step, is to assign APR pattern A to the timbres where the drums will play from, in our case timbres 5 and 6, and also to the Phantom timbre, #15.
Now you can turn on the ARP and the pattern will play, and if you turn it off, you can play the keys, and the drum sounds will be silent.
That is all.
Again, thanks Dan.
Fake Delay
Thanks to Dan Stesco www.danstesco.ro for providing us with this trick.
This doesn’t apply to the microSTATION only, but since the effects processor of that little board is limited, and not as flexible like his older brothers, we need to look for options to combine different effects. So, lets get to it:
The thing is, I’m rebooting my Genesis cover band with a few friends, and my son as the drummer. So, I got a microSTATION, expecting to recreate all the sounds I used to have on my M50, but to my horror, I can’t assign effects freely as I could with the M50. There are so many effects available depending on the slots, if they are IFX or MFX or TFX. So, I need to use them wisely.
I was building a combi for Fading Lights, including an arpeggio pattern to mimic the drum machine that Tony Banks used back in 1992. But, the sound have a delay kind of effect. Now, if I put Chorus, which is vital for any Genesis sound, and add some reverb, to give the sound ambience and presence, I can’t use the delay effect anywhere else. And if I use the delay for the drum machine, I can’t use reverb, and the whole sound is bland and flat.
Well, first of all, duplicate the timbre that the arpeggiator is using, in my case Timbre #5 House Kit, to Timbre #6. Copy all the parameters, but reduce the volume to around 40% compared to Timbre #5. That way, the delay, or “Echo” will be fainter than the main sound, which is the idea.
Remember to assign Arpeggiator A on both timbres, since we want it to play on both, only dephased by a bit.
Now the trick. Put a delay on Timbre #6 (the fainter one), I used 800ms, but you can adjust it to your taste.
And that’s it. Now you have delay, without using an FX slot. As simple as that.
Again, thanks Dan.
Dan Stesco patches
Today we had the privilege of talking with Dan Stesco himself, the creator of so many patches we’ve been loading on our workstations for many years. He also revealed that he was involved in the development of the microSTATION, which he calls it his own “Baby Korg”. We can’t be more proud of that, Dan.
We will be providing more information and hidden tricks you can use to create drum tracks using arpeggio patterns, faking delay, etc. Is amazing the amount of customization this little wonders provide, and, as with the best hardware and software, there is always many ways of doing things.
Please visit Dan’s website for his latest patches offerings by clicking the image on the links bar on the right.
Power Supply Mod – microSTATION edition
Well, some of you might remember the mod I did for my M50, in which I installed the power supply inside the case, and used an old PC power supply jack embedded in the metal back panel. I remember that flimsy power jack was a nightmare. More than once, it sprung out of its jack, and in the middle of a song. Aghhh!!! With this mod, the issue was fixed once and for all.
This mod have the added bonus of not having to think about packing the power supply, or dealing with the thin cable, so I decided to move on and do the same on my microSTATION. As a matter or fact, this is the third mod I do, since I also did it to my old Roland A33 controller, so kind of I know what I’m doing 😉
So, lets get to it, and please share it.

First of all, you have to cut open a hole on the back panel to fit the power jack. Make it fit snugly, to minimize movement. There are some jacks that have ears for screws, but I’m using one with retaining pressure fins, which I believe look cleaner. Although, if it were a metal panel, I would have gone with the screws version.

Next, dismount the little board that have the power jack, unplug the switch and remove a couple screws on the outside, and one on the board itself. turn it over, and you’ll see where the jack is soldered to the board. These are the soldering spots you will be testing for continuity. For this, you’ll have to cut the adapter cable (yeah, ouch!) but is worth it. Now, connect the stripped wire to the tester, put the plug in the jack, and check the solder points. The one that makes contact is the positive. Do the same to the other wire.

The next step is to solder the adapter prongs to the connectors on the rear side of the power jack. I used some copper wire around the connectors and the prongs, since both have a hole in the middle, so is easier to wrap the wire around. No need to be too much. I only did one turn. I just wanted to have something to make the solder adhere to.
 Adapter in place. Poured some hot glue around the prongs, just to cover and avoid any possible short, and also below the adapter itself, to make it adhere to the plastic case. it won’t move too much, being soldered to the jack, but I just wanted extra safety. I don’t want the adapter banging around inside the case.
 Next, soldering. If you are not comfortable using a soldering iron, look for someone who is. Is not a highly miniaturized device, that requires special soldering abilities. Is just simply heating up the points already on the board, enough to melt the solder a bit to make the cable stick, and put a bit more solder around them. That is all in reality. No rocket science.
I also made a small loop on the cable, and secured it against one of the board corner holes with a small zip tie, just to avoid any tension.
 Board back in place, and as you can see, is hardly noticeable that something is attached to the back of the board. A very clean job.
 Mission accomplished. And ready to close the case.
Enjoy
KORG ZONE

Korg Zone, on Synth Zone is an old website, but very valuable since it have lots of very useful links for KORG related information, patches, manuals, general and technical synth information and more.
Source: KORG ZONE
And there is more…
Now playing the microSTATION like a guitar. This guys can do it all!!!
microSTATION – King of Funk!!!
Look what I found. This guy from Korg Japan knows a thing or two about groove and funk!!! Check from 2:45 forward. You’ll gonna love it.
Absolute Kross
As always, Absolute Music delivers. Excellent review and demo of Korg’s entry level workstation.
Korg Pa4X Unparalleled Performance
The latest from Korg Arrangers.


You must be logged in to post a comment.